Pages

Friday, December 12, 2014

Clear fmadm or FMA fault logs

If the System Administrator doesn't have log rotation setup, logs fill up on the server from time to time. Usually the system or audit logs are the root cause, but sometimes the Fault Management Architecture (FMA) logs are the cause. On Solaris or if installed on Linux, there is a utility called fmd (Fault Manager Daemon) that checks for issues with the system hardware. This program is managed by the fmadm program. Follow the steps below to clear out the logs.

Clear error fmadm reports
root@earth> fmadm repair  UUID
The UUID is the event code that is shown when you run the fmadm faulty command.

* Note: If the above command doesn't clear the error then, there is a real issue hardware that needs to be addressed.

Clear reports and resource cache
root@earth> cd /var/fm/fmd
root@earth> rm e* f* c*/eft/* r*/*

Clearing out FMA files without rebooting.
root@earth> svcadm disable -s svc:/system/fmd:default
root@earth> cd /var/fm/fmd
root@earth> find /var/fm/fmd -type f -exec ls {} \;
root@earth> find /var/fm/fmd -type f -exec rm {} \;
root@earth> svcadm enable -s svc:/system/fmd:default


Reference
blogs.oracle.com: How to clear fmadm log or FMA faults log
Fault Management Architecture

Manpage:
fmadm(1M)
fma

Tuesday, September 30, 2014

Symantec Training


I found some free Symantec training. All you need to do is register for a account. The free classes are listed as Symantec eLibrary. Select this item and go to the checkout.

http://techcenter.symantec.com/ecampus/enterprise


Thursday, September 18, 2014

Unlock locked accounts

These are my notes no unlocking user accounts, below I go over a few ways to get a user account back up and running. Such as changing the expiration date on an expired account and resetting the PAM Tally for a user.

In keeping with the space theme, I will be using earth as the server's hostname and man as the name of the user account.

This the most common way to unlock your account.
root@earth> passwd -u man

Change the expiration date of the user account
root@earth> usermod --expire 9999 man

This works on some systems
root@earth> ipa user-unlock man

This resets the account if all else fails.
root@earth> pam_tally --user=man --reset


References.
www.cyberciti.biz
From RHEL user-unlock command
SuperUser pam command

Wednesday, September 17, 2014

Disable VRFY for Postfix (Retina ID 146)

The Retina Network Security Scanner from BeyondTrust, Inc was run against my servers and ID 146 was a hit or finding on one of my servers. Retina can give good results on network security vulnerabilities, but false finds are also common. The problem with that the scanner is that it doesn't show you how it finds the vulnerability or how to fix it. I did some research and it turns out that you need to disable the VRFY command in postfix. Below I have posted the security vulnerability from Retina, with instructions on how to fix the issue.

What Retina says about the vulnerability 

Retina ID or vID 146
Description The VRFY command can lead to a remote attacker gaining the first and last name registered to any given email account. This can aid an attacker in social engineering attacks.
Discussion - fix Follow your SMTP server's manual on how to disable the VRFY command. If no instructions are provided contact your SMTP server's vender.
Severity = Low to Med
SevCode = III
Port = TCP:25
IA Controls = Mail Server
Retina scan Version 5.19.9.2802
Expected "252" and found "252 2.0.0. administrator"

Test for this issue.
man@earth> telnet localhost 25
Trying 127.0.0.1...
Connected to localhost
Escape character is '^]'.
220 earth.planet.com ESMTP Postfix
VRFY
502 5.51.1 VRFY command is disabled

If the VRFY command does not come back as "VRFY command is disabled" then this is a finding.

Remediation
Add this line below to the /etc/postfix/main.cf.
disable_vrfy_command = yes

Reference section

Ref for fix:
cyberciti.biz

Ref for Security issue:
iss.net
xforce.iss.net

Manpages
Sendmail
Postfix

Monday, September 15, 2014

Brocade Training

It appears that Brocade has some free training on their website. I don't know about you but I love free training. You will need to register on the site to get these benefits.


http://community.brocade.com/t5/Brocade-University/Brocade-University-At-a-G
lance-Schedule/ta-p/3063


I hope someone finds this useful.

Wednesday, August 27, 2014

How to install or upgrade Java in Linux

These are my notes on how to install or update Java on a Linux server. In this how to, I will be using the Java from Oracle and not the operating systems or distros repository. You can download and install either a rpm or a tar file, from Oracle's site.

When using the Java provided on Oracle's website, they give you a choice of downloading rpm or tar file.

You can download Java here.
http://www.java.com/en/download/linux_manual.jsp

Installing Java with using RPM

Find the current version of Java on the system.
root@earth> find / -name java -type f
/usr/java/jre1.7.0_55/bin/java

Note If you use which or java -version commands to find Java on you system. This will only show your the system's main java. You may have additional versions installed.

Now take each line of output and paste it at the end of this command. This gives you the name of the rpm package that installed this file and version of Java.
root@earth> rpm -qf    /usr/java/jre1.7.0_55/bin/java
jre-1.7.0_55-fcs

Uninstall the old package.
root@earth> rpm -e  jre-1.7.0_55-fcs

Note- Do not run the above command for java that is part of an application. If the file was in /usr/bin/ you should be fine.

Install Java
root@earth> rpm  -ivh    jre-7u65-linux-x64.rpm

You can alternately upgrade Java instead.
root@earth> rmp   -Uvh    jre-7u65-linux-x64.rpm

Install Java using a tar file
Change directory to where Java is going to be installed. Usually it will be /user/java.
root@earth> cd  /usr/java

Move the tar file to /usr/java.

Unpack the tarball and install Java
root@earth> tar  zxvf   jre-7u65-linux-i586.tar.gz

Delete the tar file after you test Java and your done.

Reference:
Java.com

Related posts on this Blog
How to install Java 7 & 8 on Solaris
Access the Java Control Panel
Updating Java on Solaris


Tuesday, August 26, 2014

How to Manually Remove the NetBackup Client on Linux


These are my notes on removing a NetBackup client on a Linux system. This how to is based on the Symantec Tech Note, which is referenced at the bottom of this post. This is for the most part the recommended way of removing NetBackup. I have added a few more steps so that your logs are not filled with error messages.

Shut down running NetBackup processes. (optional)
man@earth> sudo netbackup stop
stopping the NetBackup client daemon
stopping the NetBackup network daemon

Or you can use this command.
man@earth> sudo bp.kill_all

Looking for NetBackup processes that need to be terminated.

Looking for more NetBackup processes that need to be terminated.
Stopping bpcd...
Stopping vnetd...

Check for running processes. (optional)
man@earth> sudo bpps -x
NB Processes
------------

Shared Symantec Processes
-------------------------
root 2827 1 0 Apr22 ? 00:00:00
/opt/VRTSpbx/bin/pbx_exchange
If you see more then what is list above then than NetBackup didn't shut down. If the commands didn't work then move to the next step.

Remove the NetBackup client.
man@earth> rm -r /usr/openv

Look for NetBackup files in xinet.d
man@earth> ls -l /etc/xinetd.d/
Look for the bpcd, bpjava-msvc, ventd and vopied files. If the file is found remove it.

Edit the services file.
Backup the /etc/services file. Remove all NetBackup services, such as the ones listed above.

Restart xinetd 
For Susie run this command
man@earth> sudo /etc/rc.d/xinetd restart

For all others run this command
man@earth> sudo /etc/rc.d/init.d/xinetd restart


Reference:
Tech Note 71923

If you have any questions or comments post they below.

Monday, August 11, 2014

Checking Java Versions Remotely

This is the script I use to find instances of Java, on the servers I manage. To do this I use two scripts, check-java and stig-java. The check-java script logs in to each server listed in the server-list file and acts  as the control for the other script. The check-java script also combines the output of the stig-java script from each server and combines the output into a single file. The stig-java script looks for Java on the servers and sends the output to a file.

I order for this script to work you will need to setup your SSH clients for auto login. If you don't know how to do this please refer to my post How to setup SSH Keys. This script doesn't needs the automount in order to work.

What the scripts do.
First off you need to put both script in the same location. Put the scripts in your home directory in a folder called scripts. The main script, check-java copies the stig-java script to /tmp on all the servers. Then logs into all the servers, one at a time, and runs the stig-java script and sends the output to a file with the servers name. The check-java script then deletes stig-java form /tmp on all the servers. All those output files are then combined into a single file with extra lines removed.


The check-java script
#!/bin/bash
# This script is for running the stig-java script on the servers.

for s in `cat  server-list`
scp stig-java $s:/tmp 2>&1 2>/dev/null
ssh -q $s /tmp/stig-java &> ~/scripts/outputJ/$s
ssh -q $s rm /tmp/stig-java
done
cat ~/scripts/outputJ/* |egrep -v '(Runtime|HotSpot)' > ~/scripts/outputJ/solM

# Finishing up
echo -e "\e[1m ------------------------ Servers -------------------------  \033[0m" > ~/scripts/outputJ/output
echo -e " "
cat ~/scripts/outputJ/solM >> ~/scripts/outputJ/output
more ~/scripts/outputJ/output

The stig-java script
#!/bin/bash
# This script is for finding versions of Java on a server.
#
host=$HOSTNAME
echo -e "\e[1m <<<<<<<<<<<<<<<<<<<<<<<<<<<<< $host >>>>>>>>>>>>>>>>>>>\033[0m "
sudo find / \( -name 10_Recommended* -o -name scratch -o -name zones -o -name mnt  \) -prune -o -type f -name java -print 2>/dev/null >/tmp/joutput
for s in `cat /tmp/joutput`
do echo -e "\e[1m  $s \033[0m "
sudo $s -version
done
echo -e " "
rm /tmp/joutput


Let me know if this script is helpful in anyway. If you need more details or have questions let me know, by posting below.

Tuesday, April 8, 2014

Setting up Email Alerts for an ILOM

This is how to setup email alerts an Integrated Lights Out Manager (ILOM). This is a two set process,  first step is setup the SMTP client and then step up the Alerts.

Part I Setting up SMTP 

The SMTP client sends the email. There are two ways to get there in the web ILOM.
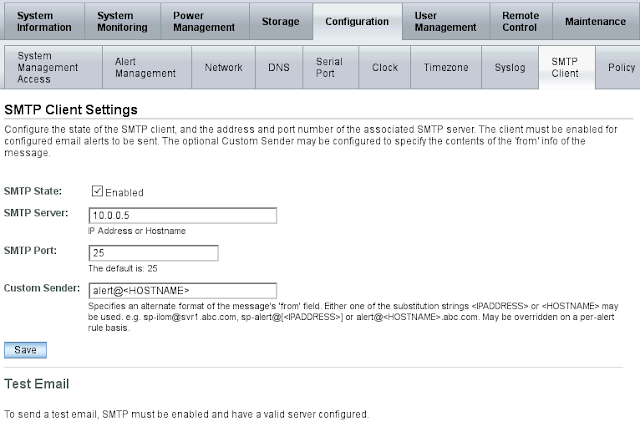
1) Go to the configuration tab and then the SMTP sub tab, to get to the SMTP setting.
2) On newer ILOMS go go to menu on the right and expand the ILOM Administration menu. Then click on Notifications. In the main area click on SMTP Client.


Make sure that the SMTP State is checked and add the IP or hostname of the SMTP server.
Put something meaning full in the Custom Sender field. This field sets the from field in the email that is sent to you. In the example above, if the servers name is mars the the email will come from alert@mars. Don't forget to save.

Not shown above, enter your email into the last field and press send to send a test email. Make adjustments as you see fit. This set is optional and can be skipped.


Part II Setting the Alert

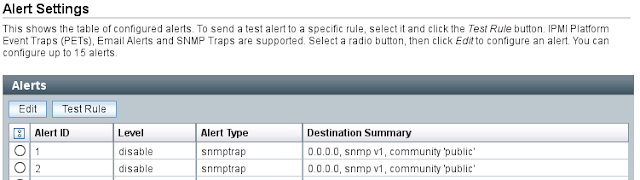
Click on the alert tab to get to the alert area.


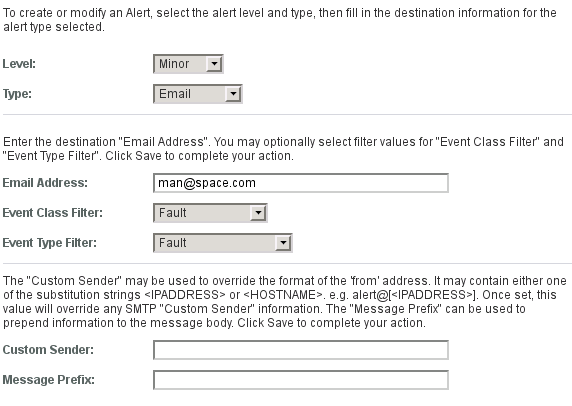
Click on the radio button and click on the Edit button to edit or create a rule. A pop up window will appear similar to one below.


Change the Level to Major or Minor. Set the Type drop down to Email. Put in your email in the Email Address field and your done. None of the other fields are needed.

Please comment below if you have anything to add.


Friday, April 4, 2014

Reimporting Tapes into NetBackup.

These are my notes on reimporting old tapes. These tapes were shipped off site after NetBackup vaulted the tapes. They are still listed in NetBackup as vaulted. In order to reuse these tapes, they will need to be expired. The steps list below will allow you to reuse the tapes.

Steps
1) Put the old tapes into the MAP.

2) In NetBackup run, inventory tape.

3) Run the command below to expire the tape.
Syntax: bpexpdate -m -d 0 -force

root@earth> bpexpdate -m E00154 -d 0 -force

On UNIX and Linux systems, the directory path to this command is /usr/openv/netbackup/bin/admincmd/
On Windows systems, the directory path to this command is \NetBackup\bin\admincmd\

4) Back in the GUI refresh your display.

5) Check to see if the imported tapes are in the scratch volume pool. Make sure all the details match the existing tapes in the library.

Reference
bpexpdate man page at Symantec.