Pages

Showing posts with label SMTP. Show all posts

Wednesday, September 17, 2014

Disable VRFY for Postfix (Retina ID 146)

The Retina Network Security Scanner from BeyondTrust, Inc was run against my servers and ID 146 was a hit or finding on one of my servers. Retina can give good results on network security vulnerabilities, but false finds are also common. The problem with that the scanner is that it doesn't show you how it finds the vulnerability or how to fix it. I did some research and it turns out that you need to disable the VRFY command in postfix. Below I have posted the security vulnerability from Retina, with instructions on how to fix the issue.

What Retina says about the vulnerability 

Retina ID or vID 146
Description The VRFY command can lead to a remote attacker gaining the first and last name registered to any given email account. This can aid an attacker in social engineering attacks.
Discussion - fix Follow your SMTP server's manual on how to disable the VRFY command. If no instructions are provided contact your SMTP server's vender.
Severity = Low to Med
SevCode = III
Port = TCP:25
IA Controls = Mail Server
Retina scan Version 5.19.9.2802
Expected "252" and found "252 2.0.0. administrator"

Test for this issue.
man@earth> telnet localhost 25
Trying 127.0.0.1...
Connected to localhost
Escape character is '^]'.
220 earth.planet.com ESMTP Postfix
VRFY
502 5.51.1 VRFY command is disabled

If the VRFY command does not come back as "VRFY command is disabled" then this is a finding.

Remediation
Add this line below to the /etc/postfix/main.cf.
disable_vrfy_command = yes

Reference section

Ref for fix:
cyberciti.biz

Ref for Security issue:
iss.net
xforce.iss.net

Manpages
Sendmail
Postfix

Tuesday, April 8, 2014

Setting up Email Alerts for an ILOM

This is how to setup email alerts an Integrated Lights Out Manager (ILOM). This is a two set process,  first step is setup the SMTP client and then step up the Alerts.

Part I Setting up SMTP 

The SMTP client sends the email. There are two ways to get there in the web ILOM.
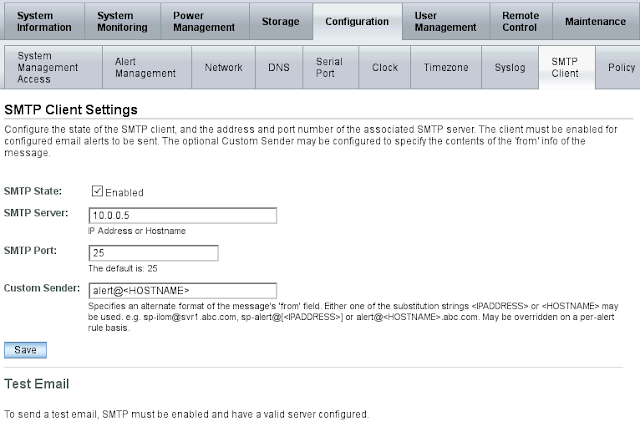
1) Go to the configuration tab and then the SMTP sub tab, to get to the SMTP setting.
2) On newer ILOMS go go to menu on the right and expand the ILOM Administration menu. Then click on Notifications. In the main area click on SMTP Client.


Make sure that the SMTP State is checked and add the IP or hostname of the SMTP server.
Put something meaning full in the Custom Sender field. This field sets the from field in the email that is sent to you. In the example above, if the servers name is mars the the email will come from alert@mars. Don't forget to save.

Not shown above, enter your email into the last field and press send to send a test email. Make adjustments as you see fit. This set is optional and can be skipped.


Part II Setting the Alert

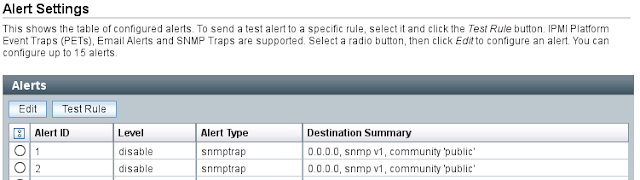
Click on the alert tab to get to the alert area.


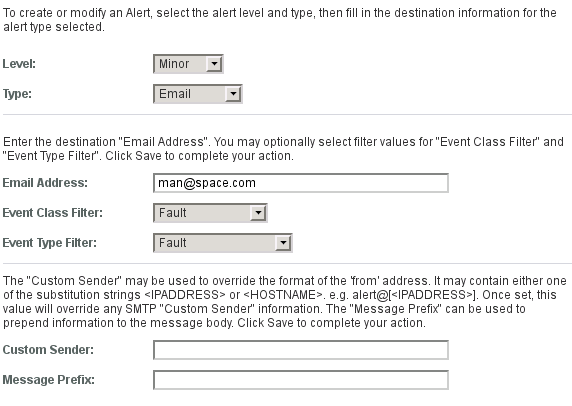
Click on the radio button and click on the Edit button to edit or create a rule. A pop up window will appear similar to one below.


Change the Level to Major or Minor. Set the Type drop down to Email. Put in your email in the Email Address field and your done. None of the other fields are needed.

Please comment below if you have anything to add.